The old Hettich MultiTech Series and front fixing clips are no longer available. The old series was discontinued around 2005, and the old clips were sold out in January of 2014. To fix drawers with the old system, you need to replace the old MultiTech system with the new MultiTech LS series drawer sides and LS front connector. While this sounds difficult, it’s really not very hard.
Here’s what you need to do:
Measure the length and height of your existing drawer sides.
The height options are: 54mm (2-1/8”), 86 mm (3-3/8”), 118mm (4-5/8”), 150mm (6”) and 214mm (8-3/8”).
The length options are: 250mm (9.84”), 350mm (13.78”), 400mm (15.75”), 450mm (17.72”), 500mm (19.68”) and 550mm (21.65”)
As you can see, you don’t have to be precise in measuring as there is a good bit of separation between sizes. The most common length is what is used in a standard depth kitchen cabinet, 22” or 550mm. The most common height is 3-3/8” or 86mm. Here’s a link to this item: https://www.ovisonline.com/MultiTech-LS-86-X-550-White-Partial-Extension-P1821.aspx
All the MultiTech LS sizes we stock are listed here: https://www.ovisonline.com/MultiTech-C236.aspx
You will need to buy one set of sides per drawer and 2 front fixing clips per drawer: https://www.ovisonline.com/MultiTech-LS-Front-Connector-86-214-P1822.aspx
Step by Step Instructions
For installation, start by removing the drawer and placing it on a smooth sturdy surface, large enough to lay-out all the parts. TIP: Have a can handy to place your screws in so you don’t lose them.
- Unscrew the old fixing clip from your drawer front, DO NOT try to remove the clips from the old drawer sides. Then place the drawer front in a safe place to prevent it from getting scratched.
- Unscrew the rear or back of the drawer box. Place the back off to the side, you will reuse this part. Have someone hold the sides stable so that the screws are all out before moving the sides. This is important so that the screw holes don’t get damaged as the box becomes loose and unstable.
- Unscrew the drawer bottom from the drawer sides. Again, have someone hold the sides stable. Place the bottom off to the side, you will reuse this part.
- Now, reassemble the drawer box. Screw the sides back onto the drawer bottom. I recommend using a hand screwdriver so as not to strip the existing screw holes.
- Screw the back on to the sides using the existing holes.
- Attach the new MultiTech LS front connectors to the drawer front. The new connectors are unhanded so you can’t get them reversed or upside down. The adjusting screws need to point to the outside of the drawer box.
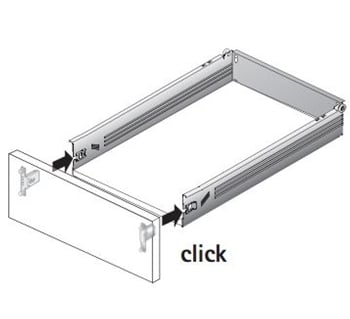 Stand the drawer box up on its back and align the clips on the drawer front with the drawer side mounting recesses. Then press firmly with the heel of your palms to snap the drawer front onto the drawer box.
- Remove the old rails or runners from the cabinet and replace with the new ones. These are handed and have a left and right. Place your new drawer box back into the cabinet.
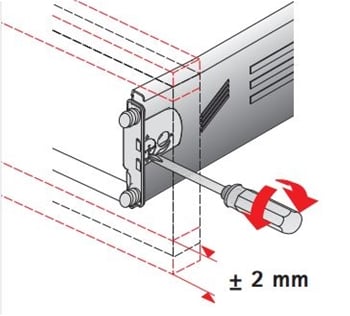 Adjust the drawer front height using the dome Philips headed screw on the front connector (± 2 mm cam height adjustment). Adjust the drawer front left or right with the slotted holes by loosening the screws that attach the front connector to the drawer front (± 1,5 mm side adjustment).
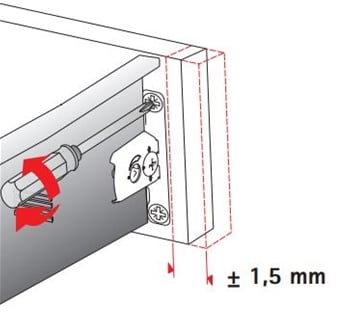
The Hettich MultiTech specifications sheet goes over some of this in more detail